Papa’s Blanket Crochet Pattern
This post may contain affiliate links, meaning that I may earn a small commission if you make a purchase. See our disclosure policy for more information.
Do you have a Papa in your life? Maybe a Pawpaw, Peepaw, Pa-paw or a Pawpoo? An older gentleman that provides love, support, an ear, or a shoulder to the family. If so, you may want to make him the new Papa’s Blanket, a free crochet pattern!
Papa’s Blanket Crochet Pattern
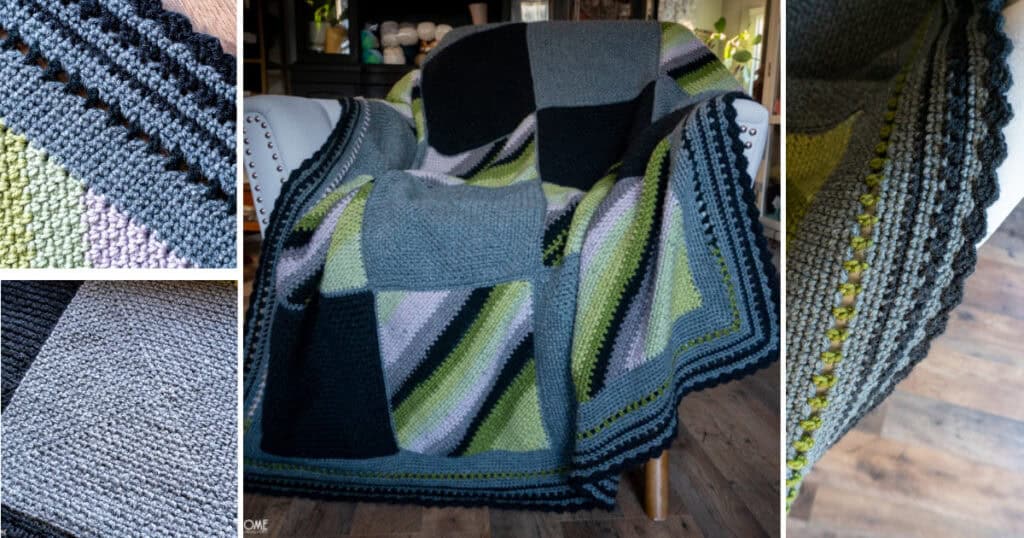
This crochet pattern is compiled of different variations of the Moss Stitch. We are using worsted weight yarn in three complimenting colors to make different square patterns that we will compile into a gorgeous, masculine, recliner-worthy throw blanket.
![]()
For the original version I used Brava Stripe in the “Lizard” colorway which has nice greens, grays, and an almost-black. I paired this with the Brava Worsted in the Cobblestone Heather and the Asphalt Heather colorways.
![]()
This blanket is the same size as the Halloween Sparkle blanket we made last fall. It ended up being about 60″ x 72″ (152 x 183 cm) after the border which is the perfect size for using on the sofa to watch the news, a sporting event on the TV, or the grandkids play when they come to visit.
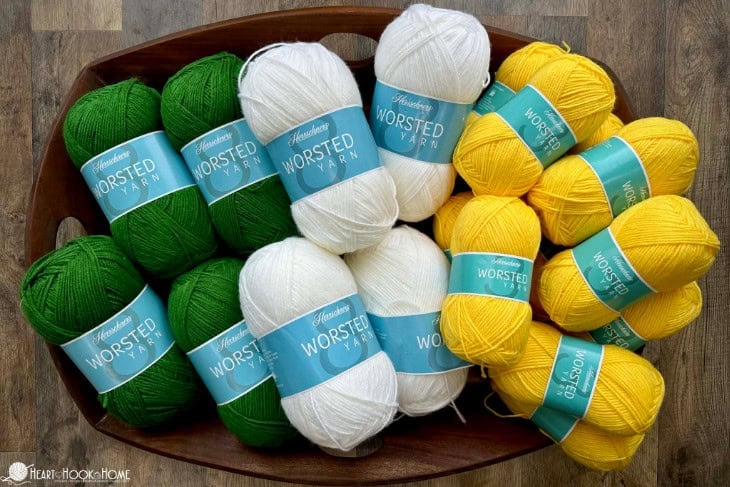
I will be making another version of this on my daily walks for my own father, whom my siblings and I all call “Papa”. He picked out the colors of the Green Bay Packers, so a rich green, a bright yellow, and a white to balance them out. For this new version I’m using Herrschners Worsted yarns in Daffodil, Dark Moss, and White.
Be sure to follow along on Instagram, Facebook, Youtube, Threads, and/or TikTok for progress videos!
Grab the ad-free, printable version of this pattern on Ravelry, Etsy, or right here in the Heart Hook Home Blog Shop. Thank you!
If you need help reading a crochet pattern, make sure you head over here and check out this detailed post.
Materials:
Worsted Weight Yarn (Brava Worsted or Herrschners Worsted recommended)
-approx. 1200 yards of Brava Stripe (“Lizard” pictured)
-approx. 1350 yards of Brava Worsted (“Cobblestone Heather” pictured)
-approx. 1350 yards of Brava Worsted (“Asphalt Heather” pictured)
Crochet hook in size H/5mm
Gauge: 15 sts in 4″ width using Single Crochet
Pattern Notes:
Patterns written using US terms.
The ch(s) at the beginning of each row do NOT count unless otherwise stated.
It is ideal for all squares to be slightly under 12″ so that we can block them all to the same size. Within half an inch (1 cm) or so is best. If you need to add another border row to get to that range, that’s perfectly fine! It’s better for your finished square to be a bit too small than too large. You can always add one more border round to get it to size.
For this pattern we are making a bunch of squares, twenty to be exact. We’re making eight using the accent color, then six with one solid color and six with the other solid color. Ready? Let’s do it!
Abbreviations:
Beg: Beginning
Sl st: Slip stitch
Ch(s): Chains
Sp: Space
Sc: Single Crochet
Ssc: Spike Single Crochet Stitch
Sk: Skip
St(s): Stitches
Sc/Ssc2tog: insert hook into indicated stitch and pull up a loop, insert hook into skipped st two rows down and pull up a loop (pull this loop up a bit so it is the same height as previous loop), yarn over and pull through all three loops on hook.
![]()
C2C Moss Square:
Using the Brava Lizard yarn, make EIGHT of these squares. Here is a full tutorial for the C2C Moss Stitch if you need it. For this square I used about 150 yards.
Row 1: Magic Circle, Ch-3, sc in circle.
Row 2: Ch-3, turn, (sc, ch-1, sc) in ch-sp from previous row.
Row 3: Ch-3, turn, sk-first sc and (sc, ch-1) in next ch-sp, (sc, ch-1, sc) in beg ch-sp of previous row. Pull the beg tail tight and continue on.
Rows 4 through 39 (or until width reaches ~11.5″): Ch-3, turn, sk-first sc and (sc, ch-1) in each ch-sp across, (sc, ch-1, sc) in the beg ch-sp of the previous row.
Row 40: Ch-3, turn, sk-first sc and sc in next ch-sp, * ch-1, sk next st, sc in next ch-sp * repeat between * * across. When you get to the end, sc in the beg-ch of the previous row (no ch
between last 2 scs).
Rows 41 – end (when only 2 sts remain): Ch-2, turn, sk-first two sts, sc in next ch-sp, * ch-1, sk next stitch, and sc in the next ch-sp * repeat between * * until you have only one st remaining. Place one sc in the beg ch-sp of the previous row. (again, no ch between last 2 scs)
Finishing: Ch-1, turn, sc in the beg ch-sp of the previous row.
Border: Do not turn, but rotate clockwise. Sc evenly down row ends, 3sc in corner. Sc in each st/sp to end, 3sc in corner. Sc evenly up row ends, 3sc in corner. Sc in each st to end, 2sc in last st. If desired, do one more round of sc to clean things up or to get the square to size.
Fasten off with Invisible Join.
![]()
![]()
Double Moss Square:
Using the Brava Worsted yarn, make SIX of these squares. Head over for the full Double Moss stitch tutorial if needed. For this square I used about 150 yards.
Row 1: Ch-44, sc in second ch from hook and in each ch to end. (43)
Row 2: Ch-1, turn, sc in first st, * ch-1, sk-next st, sc in next * repeat between * * to end. (43)
Row 3: Ch-1, turn, sc in first st, * Ssc in skipped st two rows down, ch-1, sk next st * repeat between * * until two sts remain, Ssc in skipped st two rows down, sc in final st. (43)
Row 4: Ch-1, turn, sc in first two sts, * ch-1, sk- next ch-sp, sc in next Ssc * repeat between * * until one st remains, sc in final st. (43)
Row 5: Ch-1, turn, sc in first st, * ch-1, sk next st, Ssc in sp two down * repeat between * * until two sts remain, ch-1, sk next st, sc in final st. (43)
Row 6: Ch-1, turn, sc in first st, * ch-1, sk-next ch-sp, sc in Ssc * repeat between * * until two sts remain, ch-1, sk-next ch-sp, sc in final st. (39)
Row 7: Ch-1, turn, sc in first st, * Ssc in ch-sp two rows down, ch-1, sk next st * repeat between * * until two sts remain, Ssc in ch-sp two rows down, sc in final st. (43)
Rows 8 through 51: repeat rows 4 through 7 in order (43)
Row 52: repeat row 4
Row 53: repeat row 5
Wanna save this for later?
Row 54: repeat row 6
Row 55: Ch-1, turn, sc in first st, * Ssc in ch-sp two rows down, sc next st * repeat between * * until two sts remain, Ssc in ch-sp two rows down, sc in final st. (43)
Border: Rotate square and sc evenly down row ends. 3sc in corner st, sc across bottom edge. 3sc in corner st, sc evenly up row ends. 3sc in corner st, sc in each st across, 2sc in same as starting. If desired or needed, do one more round of sc to clean things up or to get the square to size. Fasten off using Invisible Join.
![]()
Moss Granny Square:
Using the Brava Worsted yarn, make SIX of these squares. For this square you’ll need about 150 yards, and you’ll simply keep adding rows until the square is 11.25″ (28.5 cm) – 11.5″ (29.25 cm) or so.
This is a great square to follow along with the full Moss Stitch Granny tutorial, so I’ve included that for you here. Getting started is the hardest part!
Row 1: Magic Circle, [sc, ch-1] 4X in circle. Join with a sl st to top of first sc. (8) Mark each ch-sp with a stitch marker.
Round 2: Ch-1, turn, sc in marked sp to the right of the join, ch-1, (sc, ch-1, sc, ch-1) in each of the next 3 marked ch-sps, sc in same as first st marker, ch-1. Join to top of first sc. (16)
Round 3: Ch-1, turn, (sc, ch-1) in same ch-sp as join, * sc in next ch-sp, ch-1, (sc, ch-1, sc, ch-1) in marked/corner sp * repeat between * * two more times, sc in next ch-sp, ch-1, sc in same ch-sp as first st, ch-1. Join to top of first sc. (24)
Round 4: Ch-1, turn, (sc, ch-1) in same ch-sp as join, * (sc, ch-1) in each ch-sp to corner, (sc, ch-1, sc, ch-1) in corner sp * repeat between * * two more times, (sc, ch-1) in each ch-sp to corner, (sc, ch-1) in same ch-sp as first st, ch-1. Join to top of first sc. (32)
Repeat Round 4 until the square reaches 11.25″ (28.5 cm) – 11.5″ (29.25 cm) – (Should be around 27 rounds or so). When that happens…
Border: Ch-1, turn, sc in corner ch-sp, * Sc/Ssc2tog (see abbreviations) using next sc and the sc from two rounds down, repeating that stitch to next corner, 2sc in corner sp * repeat between * * three more times. If desired, do one more round of sc to clean things up or to get the square to size. Fasten off using Invisible Join.
![]()
When you get to the twenty squares needed for your throw, it’s time to assemble them together.
Assembly:
For assembly I used the seaming technique that I used in this similar blanket. Since I’m using dark yarn for joining the squares I am not going to attempt to share photos. That being said, here is a great video tutorial for How to Join Crochet Squares, or you can watch it on YouTube here. Be sure to subscribe while you’re there!
![]()
![]()
Blanket Border:
Using the lighter of the two solid colors, attach near any corner…
Round 1: Ch-1, sc in each st around, placing 3sc in each corner st. Join to first st.
Rounds 2 through 6: Ch-1, sc in each st around, placing 3sc in each corner. Join to first st.
Change to Brava Stripe or darker accent color…
Round 7: Ch-1, * hdc in next st, ch-1, sk next st * repeat between * * around entire blanket. Join to first st. (It’s okay if the corners don’t hit perfectly – no one will know).
Change back to lighter accent color…
Round 8: Ch-1, 2sc around each ch-sp from row 7, placing 3sc around each corner ch-sp. Join to first st.
Rounds 9 and 10: Ch-1, sc in each st around, placing 3sc in each corner st. Join to first st.
Change to darker accent color…
Round 11: Ch-1, sc in each st around, placing 3sc in each corner st. Join to first st.
Change back to lighter accent color…
Rounds 12 and 13: Ch-1, sc in each st around entire blanket, placing 3sc in each corner. Join to first st.
Change to darker accent color…
Round 14: Ch-2, [* sk-next st, dc in next, dc in skipped st * repeat between * * to corner, place 3dc in corner-most st,] around. Join to top of first st.
Change back to lighter accent color…
Rounds 15 and 16: Ch-1, sc in each st around entire blanket, placing 3sc in each corner. Join to first st.
Change to darker accent color…
Round 17: Ch-1, * (sc, ch-2, 2dc) in next st, sk-2 sts * repeat between * * around entire blanket. (Don’t worry about the corners.) Fasten off using Invisible Join.
![]()
Now you can weave in all of the ends throughout the blanket and the joining of the squares. You’re finished!
![]()
I hope you love it, that Papa loves it, and that it gets used often! So much love in one handmade blanket. I love it!
More free blanket patterns:
Halloween Sparkle Stitch Mix Blanket Crochet Along
Simple Tunisian Chevron Throw Blanket Pattern
Cluster Ripple Blanket: Free Pattern
How to Crochet a Corner to Corner (C2C) Throw + Video Tutorial


