FREE Scally Cap Crochet Pattern (Including VIDEO!)
This post may contain affiliate links, meaning that I may earn a small commission if you make a purchase. See our disclosure policy for more information.
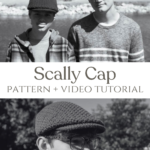


If you’ve been looking for a great hat crochet pattern for a certain someone… this is it! Work up a Scally Cap for men using this free crochet pattern.

Free Scally Cap Crochet Pattern
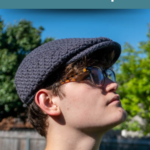
Whether you call it a scally cap, a flat top hat, or a golfers hat, it is sure to be the perfect accessory for that certain someone in your life. For this scally cap crochet pattern we are using a worsted weight yarn, preferably with partial wool content. I am using Cascade 220, a worsted weight/size 4 100% Peruvian Wool yarn.
For all sizes of this cap we need less than ONE hank of yarn. Love that!

Of course you could use regular worsted weight acrylic yarn but I think the feel of the wool really pulls everything together. If you do not have access to Cascade 220, you could substitute Wool of the Andes Worsted, Twill Worsted, Lion Brand Wool Ease, or Fishermen’s Wool. In fact, the Fishermen’s Wool skein is large enough that you could get TWO caps from one skein!

This hat style is a classic design that is instantly recognizable. With it’s stiff brim and comfortable fit, many like to wear this type of hat while golfing or otherwise out and about. Going golfing with the guys? Grabbing a beer on the patio with friends? Wear the flat top cap. 😉
The top of the cap is flat, hence the name Flat Top Hat, and the front is folded in on itself making the bill nearly indistinguishable from the sides. The way this crochet pattern is constructed means that there is very little sewing. We only seam the back of the head, and not much at that.
This hat is sized to fit an adult human head, up to about 22″ circumference.

For this pattern we are using the Alternating Single Crochet Spike stitch. I decided to use this stitch because the fabric it creates is as bit stiffer than other stitches, meaning that it is nice and thick, helping to keep its structure without being too floppy.
See a full video tutorial for the Alternating Single Crochet Spike stitch to get your feet wet before starting.

Other patterns using this stitch:
Swagger Sweater: Crochet Sweater for Men
Swagger Sweater CHILD Sizes: Free Crochet Pattern
Free Cross-Body Bag Crochet Pattern
Ready to make your golfers cap? Grab your supplies and let’s start!

Grab the ad-free, printable version of this pattern on Ravelry, Etsy, or right here in the Heart Hook Home Blog Shop. Thank you!
If you need help reading a crochet pattern, make sure you head over here and check out this detailed post.
Materials:
Worsted weight yarn (Cascade 220 pictured, 100% Peruvian Wool)
-approx. 210 yards
Crochet hook in size I/5.5mm
(2) stitch markers
Paper plate or empty milk carton (for hat bill)
Scroll down to follow along with the VIDEO tutorial!
Gauge:
14 sts x 20 rows = 4” square using the Alternating Single Crochet Spike Stitch
Pattern Notes:
Pattern written using US terms.
The chain at the beginning of the row does not count as a stitch.
Make the first Ssc of the increase rows nice and tall.
“Right side” is odd numbered rows, “wrong side” is even numbered rows.
Pattern:
Row 1: Ch-8, 2sc in 2nd ch from hook, sc in each of next 5 chs, 2sc in final ch. (9)
Row 2: Ch-1, turn, sc in first st, Ssc over same st, sc in next. * Ssc over next, sc in next * repeat between * * until one st remains. Ssc over final st, sc in same. (11)
Rows 3 – 6: repeat row 2 (ending with 19 sts)
Row 7: Ch-1, turn, sc in first 2 sts, Ssc over next, * sc in next, Ssc over next * repeat between * * across. Sc in each of final 2 sts. (19)
Row 8: Ch-1, turn, sc in first st, Ssc over next, * sc in next, Ssc over next * repeat between * * across. Sc in final st. (19)
Rows 9 – 17: repeat rows 2, 7, 8 in order (ending with 25 sts)
Row 18: repeat row 2 (27)
Rows 19 – 38: alternate rows 7 & 8 (27)
Row 39: Ch-1, turn, sc2tog using first 2 sts, Ssc over next, * sc in next, Ssc over next * repeat between * * across. Sc2tog using final 2 sts. (25)
Row 40: repeat row 7 (25)
Row 41: repeat row 8 (25)
Rows 42 – 47: repeat rows 39 – 41 (ending with 21 sts)
Do not fasten off. Place a stitch marker in the base of the first and the final stitch of row 47.

Continue to make the “back” where still attached…

Rows 48 – 61: alternate rows 7 & 8 (21)
Fasten off leaving a ~10” tail for seaming.


Row 1: Ch-1, sc 28x evenly up to row 1, sc 7x times across row 1, sc 28x evenly down the other side to opposite st marker. (63)


Row 2: Ch-1, turn, sc in first 2 sts, Ssc over next, * sc in next, Ssc over next * repeat between * * across. Sc in each of final 2 sts. (63)
Row 3: Ch-1, turn, sc in first st, Ssc over next, * sc in next, Ssc over next * repeat between * * across. Sc in final st. (63)
Rows 4 – 15: alternate rows 2 & 3
Wanna save this for later?


Fold up the “back” and, using the yarn tails, seam the back left and back right as pictured.


Hat Bill (make two):
Row 1: Ch-11, sc in 2nd ch from hook and in each to end. (10)

Row 2: Ch-1, turn, sc in 9 sts, 3sc in last, rotate, 2sc in row end. (14)


Row 3: Ch-1, turn, 2sc in first, sc in 12 sts, 3sc in next, rotate, sc in row end, sc in base of row 1. (19)


Row 4: Ch-1, turn, 2sc in first, sc in 17 sts, 2sc in last. (21)

Row 5: Ch-1, turn, 2sc in first, sc in 6 sts, 2sc in next, sc in 5 sts, 2sc in next, sc in 6 sts, 2sc in last. (25)

Row 6: Ch-1, turn, 2sc in first, sc in 23 sts, 2sc in last. (27)

Row 7: Ch-1, turn, 2sc in first, sc in 10 sts, 2sc in next, sc in 3 sts, 2sc in next, sc in 10 sts, 2sc in last. (31)

Row 8: Ch-1, turn, 2sc in first, sc in 29 sts, 2sc in last. (33)
Row 9: Ch-1, turn, 2sc in first, sc in 31 sts, 2sc in last. (35)
Row 10: Ch-1, turn, 2sc in first, sc in 33 sts, 2sc in last. (37)
Row 11: Ch-1, turn, 2sc in first, sc in 35 sts, 2sc in last. (39)

Line up the two brims, insert cardboard (I used a paper plate) or a milk carton cut to size.


With wrong sides together, sl st the two bills around the curved (outside) edge. Do not fasten off.


Rotate and sc 31x evenly along the inner curve using both thickness of fabric. Do not fasten off.

Edging:
Using yarn still attached on the hat bill, insert hook in the 16th stitch to the right of the seam as pictured…

Row 1: Ch-1, sc in same as join and next 15 sts, sc in each of 21 “back” sts, sc in next 16 sts. Sc through both thicknesses (bill and hat body) of all 31 sts across.


Row 2: Do not turn, sc in each st around entire opening (81)
Feel free to add an additional row or two of single crochet if needed.
Fasten off leaving a ~20” long tail. Fold the top of the hat down to the edge of the hat bill. Use the tail to sew together as pictured. Weave in all ends.
CROCHET SCALLY CAP VIDEO TUTORIAL:
If you would rather watch this video on YouTube, you can find it on my channel here. Don’t forget to subscribe while you’re there! 😉


That’s it! Remember that you can grab the ad-free, printable version of this pattern on Ravelry, Etsy, or right here in the Heart Hook Home Blog Shop. Thank you!

What color will you make yours? I can’t wait to see it! Please share with my by tagging @HeartHookHome across all social media or in the Heart Hook Home Crochet Community on Facebook.
More crochet patterns for you:
Grid Slouch: Free Unisex Slouchy Hat Crochet Pattern
Andy’s Scarf & Beanie Crochet Pattern Set
Bricktown Slouch: Free Slouchy Beanie Crochet Pattern


11 Comments