Swagger Sweater CHILD Sizes: Free Crochet Pattern
This post may contain affiliate links, meaning that I may earn a small commission if you make a purchase. See our disclosure policy for more information.
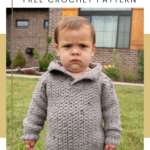

The Swagger Sweater pattern for adults has been popular since it’s release, and now it is time to introduce the CHILD sizes, ranging from 2/3T up to 12/14 youth.

Swagger Sweater CHILD Sizes
The Swagger Sweater now comes as small as 2T and as large as 3XL for adults. This means that it would be the perfect pattern to whip up for family photos this fall! Great to include on Christmas or greeting cards this season, and with plenty of time to work them all up, too!


As with all Heart Hook Home crochet patterns that range from toddler to adult, the child sizes of this pattern are free. 🙌

For this pattern we are using a worsted weight yarn. You could use anything from Brava Tweed as I have here, to Lion Brand Vanna’s Choice, Big Twist, Red Heart, or any other brand that is able to meet gauge.

For more information on gauge, check out this post, or this podcast episode. This is extremely helpful information especially if you are new to crocheting wearables.

Now let’s get our supplies together, shall we?
Materials:
Worsted Weight Yarn (Brava Tweed used)
-approx (650, 800, 1000, 1180, 1400) yards
Crochet hook in size I/5.5mm
Optional – (4 or 5) 9/16” buttons
Gauge: 13 sts x 20 rows = 4” square
Gauge Pattern:
Row 1: Ch-17, sc in 2nd chain from hook and in each to end. (16)
Rows 2 – 24: Ch-1, turn, sc in first 2 sts. * Ssc over next, sc in next * repeat between * * to end. (16) Measure for gauge as per the stitch counts and row counts above. See more on gauge and how to adjust it here.
Pattern Notes:
Pattern written using US terms.
Alternating Single Crochet Spike Stitch (Ssc). See the full tutorial here.
The ch-1 at the beginning of the row does NOT count as a stitch.
Even numbered rows are the “right side”.
BLO = Back Loop Only
The front panels overlap by four stitches. The first side has a strip of single crochets 4 stitches wide to which you will attach buttons, while the second side uses the alternating spike stitch as in the main portion of the pattern. Try not to make those 4 single crochets too tight! It also helps the collar to lay better if you always turn your work to the left when working those rows.
Sizing: (2/3T, 4/5T, 6/8, 10/12, 12/14) fits chest up to (23”, 25”, 27”, 31”, 36”)
Grab the ad-free, PDF version of this pattern on Ravelry, Etsy, or right here in the Heart Hook Home blog shop!
If you need help reading a crochet pattern, make sure you head over here and check out this detailed post.
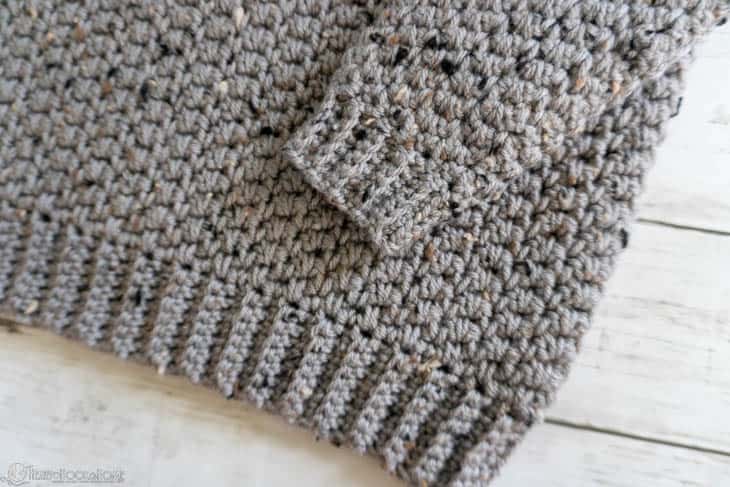
Bottom Edging:
Row 1: Leaving a ~10” long tail for seaming later, Ch-9, sc in 2nd ch from hook and in each to end. (8)
Rows 2 through (76, 84, 92, 104, 112): Ch-1, turn, sc in BLO of next 9 sts, sc using both loops of final st. (8)
Join to top of row 1 to form a circle without twisting. We will now switch to working in rounds, joined and turned after each unless otherwise noted.

Body:
Round 1: Ch-1, sc in each row end around. Join to top of first sc. (76, 84, 92, 104, 112)
Round 2: Ch-1, do not turn, * sc in next, Ssc over next * repeat between * * around. Join to top of first sc. (76, 84, 92, 104, 112)
Rounds 3 through (42, 54, 64, 72, 76): Ch-1, turn, * sc in next, Ssc over next * repeat between * * around. Join to top of first sc. (76, 84, 92, 104, 112)

Separate into “Front” and “Back” by crocheting in rows back and forth…
Back:
Row (43, 55, 65, 73, 77): Ch-1, turn, 2sc in next st. * Ssc over next, sc in next * repeat between * * (16, 18, 20, 22, 24) more times. (36, 40, 44, 48, 52)
Rows (44, 56, 66, 74, 78) through (62, 84, 96, 106, 110): Ch-1, turn, sc in first 2 sts. * Ssc over next, sc in next * repeat between * * (16, 18, 20, 22, 24) more times. (36, 40, 44, 48, 52)
Fasten off leaving long enough tail to sew shoulders and start on “fronts”.
Front (right pec):
Leave (2, 2, 2, 4, 4) sts open from “back” and looking at the inside, attach in next st. (should be a sc) Work in rows back and forth.
Row (43, 55, 65, 73, 77): Ch-1, sc in same as join, sc in next st. * Ssc over next, sc in next * repeat between * * (6, 7, 8, 9, 10) more times. Sc in next 4 sts. (20, 22, 24, 26, 28)
Row (44, 56, 66, 74, 78): Ch-1, turn, sc in first 4 sts, * Ssc over next, sc in next * repeat between * * to end. (20, 22, 24, 26, 28)
Row (45, 57, 67, 75, 79): Ch-1, turn, sc in first 2 sts, * Ssc over next, sc in next * repeat between * * (6, 7, 8, 9, 10) more times. Sc in remaining 4 sts. (20, 22, 24, 26, 28)
Rows (46, 58, 68, 76, 80) through (62, 84, 96, 106, 110): alternate previous two rows. (20, 22, 24, 26, 28) Fasten off leaving a long enough tail to sew shoulders.
Front (left pec):
This flap will overlap the first “front” by 4 stitches. Work the first Ssc of the first row into the next open single crochet when looking at the inside “front” already made.
Row (43, 55, 65, 73, 77): Ch-4, * Ssc over next, sc in next * repeat between * * (7, 8, 9, 10, 11) more times. (20, 22, 24, 26, 28)
*This should leave you with (2, 2, 2, 4, 4) sts open for each underarm.
Row (44, 56, 66, 74, 78): Ch-1, turn, sc in first 2 sts. * Ssc over next, sc in next * repeat between * * across, sc in remaining 4 chs. (20, 22, 24, 26, 28)
Rows (45, 57, 67, 75, 79) through (62, 84, 96, 106, 110): Ch-1, turn, sc in first 2 sts. * Ssc over next, sc in next * repeat between * * to end. (20, 22, 24, 26, 28) Do not fasten off, place stitch marker. We’ll use this to start the collar.
Shoulders:
Line up front to back and start at the outside working in, sew stitch for stitch for the width of (8, 10, 10, 12, 14) sts on each side. Do not weave in ends yet, we’ll use those to cinch up any holes at the very end.
Collar:
Again, do not make the single crochet strip too tight. Also, consistently turning to the left makes the collar lay better.
Row 1: Where still attached on the second “front”… Ch-1, turn, sc in first 2 sts, * Ssc over next, sc in next * repeat between * * around the entire collar, sc in final 4 sts.
Row 2: Ch-1, turn, sc in first 4 sts, * Ssc over next, sc in next * repeat between * * around.
Rows 3 through 9: Alternate previous two rows. Fasten off.

Attach at the very base of the collar, on the “inside” corner flap (where the 4sc strip is).

Row 1: Ch-1, sc evenly up sc row ends, 3sc in corner st, sc in each st across, 3sc in corner st, sc evenly down row ends.
Row 2: Ch-1, turn, sc up to corner, 3sc in corner st, sc across, 3sc in corner st, sc down to beginning. Fasten off leaving a ~12” long tail. Sew front flap down so that it overlaps by those 4 stitches.
Sleeves (separated out by size):
Looking at the outside, attach the bottom center of either armhole…
 Attach in center st (should be a Spike Stitch).
 Stitch placement for first row of sleeve.
 Round 1 of sleeve complete.
 Sc2tog (decrease) example.
Size 2/3T:
Row 1: Ch-1, sc in same as join. * Ssc over next, sc in next * repeat between * * to shoulder seam (14 sts so far). Repeat between * * down other side. Join to top of first sc. (28)
Rows 2 – 8: Ch-1, turn, * sc in next, Ssc over next * repeat between * * around. Join to top of first sc. (28)
Row 9: Ch-1, turn, sc2tog, * sc in next, Ssc over next * repeat between * * around. Join to top of first sc. (27)
Row 10: Ch-1, turn, * sc in next, Ssc over next * repeat between * * around, sc in last st. Join to top of first sc. (27)
Row 11: Ch-1, turn, Ssc over first, * sc in next, Ssc over next * repeat between * * around. Join to top of first sc. (27)
Rows 12 – 15: alternate rows 10 & 11 (27)
Row 16: Ch-1, turn, sc2tog, sc in next. * Ssc over next, sc in next * repeat between * * around. Join to top of first sc. (26)
Rows 17 – 22: Ch-1, turn, * Ssc over next, sc in next * repeat between * * around. Join to top of first sc. (26)
Row 23: Ch-1, turn, sc2tog, * Ssc over next, sc in next * repeat between * * around. Join to top of first sc. (25)
Rows 24 – 29: repeat rows 11, 10, 11, 10, 11, 10 in order (25)
Row 30: Ch-1, turn, sc2tog, * Ssc over next, sc in next * repeat between * * around. Ssc over last. Join to top of first sc. (24)
Rows 31 – 32: repeat row 2 (24)
Row 33: repeat row 9 (23)
Rows 34 – 39: alternate rows 10 & 11 (23)
Row 40: repeat row 16 (22)
Rows 41 – 46: repeat row 17 (22)
Jump to “cuff” section below.
Size 4/5T:
Row 1: Ch-1, sc in same as join. * Ssc over next, sc in next * repeat between * * to shoulder seam (15 sts so far). Repeat between * * down other side. Join to top of first sc. (30)
Rows 2 – 12: Ch-1, turn, * sc in next, Ssc over next * repeat between * * around. Join to top of first sc. (30)
Wanna save this for later?
Row 13: Ch-1, turn, sc2tog, * sc in next, Ssc over next * repeat between * * around. Join to top of first sc. (29)
Row 14: Ch-1, turn, * sc in next, Ssc over next * repeat between * * around, sc in last st. Join to top of first sc. (29)
Row 15: Ch-1, turn, Ssc over first, * sc in next, Ssc over next * repeat between * * around. Join to top of first sc. (29)
Rows 16 – 19: alternate rows 14 & 15 (29)
Row 20: Ch-1, turn, sc2tog, sc in next. * Ssc over next, sc in next * repeat between * * around. Join to top of first sc. (28)
Rows 21 – 26: Ch-1, turn, * Ssc over next, sc in next * repeat between * * around. Join to top of first sc. (28)
Row 27: Ch-1, turn, sc2tog, * Ssc over next, sc in next * repeat between * * around. Join to top of first sc. (27)
Rows 28 – 33: repeat rows 15, 14, 15, 14, 15, 14 in order (27)
Row 34: repeat row 20 (26)
Rows 35 – 38: Ch-1, turn, * Ssc over next, sc in next * repeat between * * around. Join to top of first sc. (26)
Row 39: Ch-1, turn, sc2tog, * sc in next, Ssc over next * repeat between * * around. Join to top of first sc. (25)
Rows 40 – 44: alternate rows 14 & 15 (25)
Row 45: repeat row 20 (24)
Rows 46 – 50: Ch-1, turn, * Ssc over next, sc in next * repeat between * * around. Join to top of first sc. (24)
Row 51: repeat row 27 (23)
Rows 52 – 57: repeat rows 15, 14, 15, 14, 15, 14 in order (23)
Row 58: Ch-1, turn, sc2tog, * Ssc over next, sc in next * repeat between * * around. Ssc over last. Join to top of first sc. (22)
Rows 59 – 63: repeat row 2 (22)
Jump to “cuff” section below.
Size 6/8:
Row 1: Ch-1, sc in same as join. * Ssc over next, sc in next * repeat between * * to shoulder seam (16 sts so far). Repeat between * * down other side. Join to top of first sc. (32)
Rows 2 – 16: Ch-1, turn, * sc in next, Ssc over next * repeat between * * around. Join to top of first sc. (32)
Row 17: Ch-1, turn, sc2tog, * sc in next, Ssc over next * repeat between * * around. Join to top of first sc. (31)
Row 18: Ch-1, turn, * sc in next, Ssc over next * repeat between * * around, sc in last st. Join to top of first sc. (31)
Row 19: Ch-1, turn, Ssc over first, * sc in next, Ssc over next * repeat between * * around. Join to top of first sc. (31)
Rows 20 – 23: alternate rows 18 & 19 (31)
Row 24: Ch-1, turn, sc2tog, sc in next. * Ssc over next, sc in next * repeat between * * around. Join to top of first sc. (30)
Rows 25 – 30: Ch-1, turn, * Ssc over next, sc in next * repeat between * * around. Join to top of first sc. (30)
Row 31: Ch-1, turn, sc2tog, * Ssc over next, sc in next * repeat between * * around. Join to top of first sc. (29)
Rows 32 – 35: repeat rows 19, 18, 19, 18 in order (29)
Row 36: Ch-1, turn, sc2tog, * Ssc over next, sc in next * repeat between * * around. Ssc over last. Join to top of first sc. (28)
Rows 37 – 40: repeat row 2 (28)
Row 41: repeat row 17 (27)
Rows 42 – 46: repeat rows 18, 19, 18, 19, 18 in order (27)
Row 47: repeat row 24 (26)
Rows 48 – 52: Ch-1, turn, * Ssc over next, sc in next * repeat between * * around. Join to top of first sc. (26)
Row 53: repeat row 31 (25)
Rows 54 – 59: repeat rows 19, 18, 19, 18, 19, 18 in order (25)
Row 60: repeat row 36 (24)
Rows 61 – 69: repeat row 2 (24)
Jump to “cuff” section below.
Size 10/12:
Row 1: Ch-1, sc in same as join. * Ssc over next, sc in next * repeat between * * to shoulder seam (17 sts so far). Repeat between * * down other side. Join to top of first sc. (34)
Rows 2 – 20: Ch-1, turn, * sc in next, Ssc over next * repeat between * * around. Join to top of first sc. (34)
Row 21: Ch-1, turn, sc2tog, * sc in next, Ssc over next * repeat between * * around. Join to top of first sc. (33)
Row 22: Ch-1, turn, * sc in next, Ssc over next * repeat between * * around, sc in last st. Join to top of first sc. (33)
Row 23: Ch-1, turn, Ssc over first, * sc in next, Ssc over next * repeat between * * around. Join to top of first sc. (33)
Rows 24 – 27: repeat rows 22, 23, 22, 23 in order (33)
Row 28: Ch-1, turn, sc2tog, sc in next. * Ssc over next, sc in next * repeat between * * around. Join to top of first sc. (32)
Rows 29 – 34: Ch-1, turn, * Ssc over next, sc in next * repeat between * * around. Join to top of first sc. (32)
Row 35: Ch-1, turn, sc2tog, * Ssc over next, sc in next * repeat between * * around. Join to top of first sc. (31)
Rows 36 – 39: repeat rows 23, 22, 23, 22 in order (31)
Row 40: Ch-1, turn, sc2tog, * Ssc over next, sc in next * repeat between * * around. Ssc over last. Join to top of first sc. (30)
Rows 41 – 44: repeat row 2 (30)
Rows 45 – 70: repeat rows 21 through 44 in order (ending with 26 sts)
Rows 71 – 77: repeat rows 21, 22, 23, 22, 23, 22, 28 in order (ending with 24 sts)
Rows 78 – 81: repeat row 29 (24)
Jump to “cuff” section below.
Size 12/14:
Row 1: Ch-1, sc in same as join. * Ssc over next, sc in next * repeat between * * to shoulder seam (19 sts so far). Repeat between * * down other side. Join to top of first sc. (38)
Rows 2 – 20: Ch-1, turn, * sc in next, Ssc over next * repeat between * * around. Join to top of first sc. (38)
Row 21: Ch-1, turn, sc2tog, * sc in next, Ssc over next * repeat between * * around. Join to top of first sc. (37)
Row 22: Ch-1, turn, * sc in next, Ssc over next * repeat between * * around, sc in last st. Join to top of first sc. (37)
Row 23: Ch-1, turn, Ssc over first, * sc in next, Ssc over next * repeat between * * around. Join to top of first sc. (37)
Row 24: repeat row 22 (37)
Row 25: repeat row 23 (37)
Row 26: Ch-1, turn, sc2tog, sc in next. * Ssc over next, sc in next * repeat between * * around. Join to top of first sc. (36)
Rows 27 – 29: Ch-1, turn, * Ssc over next, sc in next * repeat between * * around. Join to top of first sc. (36)
Row 30: Ch-1, turn, sc2tog, * Ssc over next, sc in next * repeat between * * around. Join to top of first sc. (35)
Rows 31 – 34: repeat rows 23, 22, 23, 22 in order (35)
Row 35: Ch-1, turn, sc2tog, * Ssc over next, sc in next * repeat between * * around. Ssc over last. Join to top of first sc. (34)
Rows 36 – 38: repeat row 2 (34)
Rows 39 – 74: repeat rows 21 – 38 in order two times. (ending with 26 sts)
Rows 75 – 79: repeat rows 21, 22, 23, 22, 23 in order (ending with 25 sts)
Row 80: repeat row 26 (24)
Rows 81 – 85: repeat row 27 (24)
Jump to “cuff” section below.
Cuff (all sizes):
Row 1: Ch-7, sc in 2nd ch from hook and in each ch to end. Sl st to corresponding open stitch on sleeve. (6)
Row 2: Sl st to next open st on sleeve, turn. Sc in blo of next 5 sts, sc in both loops of last st. (6)
Row 3: Ch-1, turn, sc in blo of each st to end. Sl st to corresponding open st on sleeve. (6)
Alternate rows 2 & 3 all the way around. Fasten off and use tail to sew last to to first row. Repeat for other sleeve.

Finishing:
Weave in all ends from the shoulder area, cinching up any holes. Sew optional buttons onto the sc strip on collar. That is it!
Grab the ad-free, PDF version of this pattern on Ravelry, Etsy, or right here in the Heart Hook Home blog shop!
How many of these Swagger Sweaters will you be making? I can’t wait to see your little ones rocking theirs. If you make the adult, I also want to see!
Please share a photo with me by tagging @HeartHookHome across all social media and in the Heart Hook Home Crochet Community on Facebook. 🤩
More free kids patterns:
Color Block Sweater Child Sizes (+ VIDEO Tutorial)
Child Sizes of the Basic V-Neck Sweater Crochet Pattern
Hibernation Hoodie CHILD Sizes
It’s Shawl Good Crochet Pattern CHILD Size


16 Comments