Velvet Cardigan Free Crochet Pattern for Big Kids
This post may contain affiliate links, meaning that I may earn a small commission if you make a purchase. See our disclosure policy for more information.
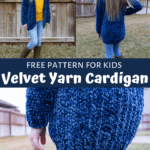
The bigger kids sizes of the Velvet Cardi are ready for your hook! For the child sizes of this velvet yarn cardigan pattern, I decided to split the posts into two: one for little kids (which can be found here) and one for big kids – this one!

Velvet Cardigan Crochet Pattern for Big Kids
All sizes included in this post require just two skeins of Bernat Velvet yarn. Yep, even the 10/12 size takes less than two skeins. WINNING!


If you have never worked with Bernat Velvet (or any velvet) before, you’ll definitely want to take a look at these tips and tricks before you get started. They will save you time and possibly a frogging in the long run!

Sizes available: 12M, 18/24M, 2/3T and then 4/6, 6/8, 8/10, 10/12
NOTE: I have broken the kids’ sizes into two posts: one for little kids HERE and this one for big kids.
Get ALL of the kids sizes together in one print-friendly PDF on either Ravelry, Etsy, or in the Heart Hook Home shop. Thank you!
If you need help reading a crochet pattern, make sure you head over here and check out this detailed post.

Big Kids Velvet Cardi
Materials:
Bernat Velvet Yarn (Bulky/315 yards per skein)
-approx. 385 yards for 4/6 (2 balls)
-approx. 435 yards for 6/8 (2 balls)
-approx. 500 yards for 8/10 (2 balls)
-approx. 530 yards for 10/12 (2 balls)
*Note that this yarn is labeled as hand wash only, lay flat to dry. While this isn’t too bad for adults, the kids sizes may need more frequent laundering. Consider using a different bulky weight yarn, such as Bernat Softee Chunky. I bet that would work (and hold up) great! I used Red Heart Hygge for one of mine and I love it. You could also use Caron Latte Cakes or Red Heart With Love Chunky (discontinued).
Crochet hook in size I/5.5mm
Gauge: 11 hdc sts x 9 rows = 4” square
Pattern Notes:
The chain at the beginning of the row does not count as a stitch.
Fhdc = Foundation Half Double Crochet (tutorial)
The body is worked in vertical rows.
Keep your tension on the tight side, especially on the decreases.
Leave longer yarn tails than normal to fully weave in ends.
Pattern written using US terms.
Find a full companion video for this pattern here.

Size 4/6T:
Row 1: Fhdc-45
Rows 2 – 28: Ch-1, turn, hdc in each st to end. (45)
Underarm/Armhole row:
Row 29: Ch-1, turn, hdc in 32 sts only, then ch-14. (46)

Front:
Row 30: Hdc in 2nd ch from hook and in each to end. (45)

Rows 31 – 36: Ch-1, turn, hdc in each st to end. (45)
Row 37: Ch-1, turn, hdc2tog, hdc2tog, hdc in each st to end. (43)
Row 38: Ch-1, turn, hdc in each st to end. (43)
Row 39: Ch-1, turn, hdc2tog, hdc2tog, hdc in each st to end. (41)
Row 40: Ch-1, turn, hdc in each st to end. (41)
Row 41: Ch-1, turn, hdc2tog, hdc2tog, hdc in each st to end. (39) Fasten off leaving a long tail for sewing shoulders. Do not weave in ends.

Other front:
Attach to bottom corner, with top of cardigan to your left as pictured…

Row 1: Ch-1, hdc in 32 sts only, then ch-14. (46)
Row 2: Hdc in 2nd ch from hook and in each to end. (45)
Rows 3 – 8: Ch-1, turn, hdc in each st to end. (45)
Row 9: Ch-1, turn, hdc2tog, hdc2tog, hdc in each st to end. (43)
Row 10: Ch-1, turn, hdc in each st to end. (43)
Row 11: Ch-1, turn, hdc2tog, hdc2tog, hdc in each st to end. (41)
Row 12: Ch-1, turn, hdc in each st to end. (41)
Row 13: Ch-1, turn, hdc2tog, hdc2tog, hdc in each st to end. (39) Fasten off leaving a long tail for sewing shoulders. Do not weave in ends.

Lay cardigan out flat and fold the two “fronts” in to form shoulders/armholes.

Sew shoulders together end for end using the Mattress Stitch. Do not weave in all of these ends yet. (We’ll use them to cinch any holes after both the edging and sleeves have been added).

Sleeves Size 4/6:
Attach yarn in bottom center of armhole with slst…
Row 1: Ch-1, hdc evenly around opening. Join to first hdc with sl st. (28)
Rows 2 – 8: Ch-1, turn, hdc in each st around. Join to first hdc with sl st. (28)
Row 9: Ch-1, turn, hdc2tog, hdc in each st around. Join to top of first hdc with sl st. (27)
Row 10: Ch-1, turn, hdc in each st around. Join to first hdc with sl st. (27)
Row 11: Ch-1, turn, hdc in all but last two sts, hdc2tog. (26)
Row 12: Ch-1, turn, hdc in each st around. Join to first hdc with sl st. (26)
Rows 13 – 20: repeat rows 9 – 12 (ending with 22 sts)
Row 21: repeat row 9 (21)
Rows 22 – 26: Ch-1, turn, hdc in each st around. Join to first hdc with sl st. (21)
Cuff:
Row 1: Where still attached… Ch-7, sc in 2nd ch from hook and in each ch to end. Sl st to next open st on sleeve. (6)
Row 2: Sl st to next open st on sleeve, turn. Sc in blo of next 5 sts, sc in both loops of last st. (6)
Row 3: Ch-1, turn, sc in blo of each st to end. Sl st to next open st on sleeve. (6)
Repeat rows 2 & 3 all the way around the cuff. When you get back to the first row, and there are no more sts left on sleeve, fasten off leaving a long enough tail to sew last row to first row of cuff.
Size 6/8:
Row 1: Fhdc-55
Rows 2 – 32: Ch-1, turn, hdc in each st to end. (55)
Underarm/Armhole row:
Row 33: Ch-1, turn, hdc in 41 sts only, then ch-15. (56)
Front:
Row 34: Hdc in 2nd ch from hook and in each to end. (55)
Rows 35 – 40: Ch-1, turn, hdc in each st to end. (55)
Row 41: Ch-1, turn, hdc2tog, hdc2tog, hdc in each st to end. (53)
Row 42: Ch-1, turn, hdc in each st to end. (53)
Row 43: Ch-1, turn, hdc2tog, hdc2tog, hdc in each st to end. (51)
Row 44: Ch-1, turn, hdc in each st to end. (51)
Row 45: Ch-1, turn, hdc2tog, hdc2tog, hdc in each st to end. (49) Fasten off leaving a long tail for sewing shoulders. Do not weave in ends.
Other front:
Attach to bottom corner, with top of cardigan to your left as pictured…
Row 1: Ch-1, hdc in 41 sts only, then ch-15. (56)
Row 2: Hdc in 2nd ch from hook and in each to end. (55)
Rows 3 – 8: Ch-1, turn, hdc in each st to end. (55)
Row 9: Ch-1, turn, hdc2tog, hdc2tog, hdc in each st to end. (53)
Row 10: Ch-1, turn, hdc in each st to end. (53)
Row 11: Ch-1, turn, hdc2tog, hdc2tog, hdc in each st to end. (51)
Row 12: Ch-1, turn, hdc in each st to end. (51)
Row 13: Ch-1, turn, hdc2tog, hdc2tog, hdc in each st to end. (49) Fasten off leaving a long tail for sewing shoulders. Do not weave in ends.
Lay cardigan out flat and fold the two “fronts” in to form shoulders/armholes. Sew shoulders together end for end using the Mattress Stitch. Do not weave in all of these ends yet. (We’ll use them to cinch any holes after both the edging and sleeves have been added).
Sleeves Size 6/8:
Attach yarn in bottom center of armhole with slst…
Row 1: Ch-1, hdc evenly around opening. Join to first hdc with sl st. (30)
Rows 2 – 8: Ch-1, turn, hdc in each st around. Join to first hdc with sl st. (30)
Row 9: Ch-1, turn, hdc2tog, hdc in each st around. Join to top of first hdc with sl st. (29)
Row 10: Ch-1, turn, hdc in each st around. Join to first hdc with sl st. (29)
Row 11: Ch-1, turn, hdc in all but last two sts, hdc2tog. (28)
Row 12: Ch-1, turn, hdc in each st around. Join to first hdc with sl st. (28)
Rows 13 – 24: repeat rows 9 – 12 (ending with 22 sts)
Wanna save this for later?
Rows 25 – 28: Ch-1, turn, hdc in each st around. Join to first hdc with sl st. (22)
Cuff:
Row 1: Where still attached… Ch-7, sc in 2nd ch from hook and in each ch to end. Sl st to next open st on sleeve. (6)
Row 2: Sl st to next open st on sleeve, turn. Sc in blo of next 5 sts, sc in both loops of last st. (6)
Row 3: Ch-1, turn, sc in blo of each st to end. Sl st to next open st on sleeve. (6)
Repeat rows 2 & 3 all the way around the cuff. When you get back to the first row, and there are no more sts left on sleeve, fasten off leaving a long enough tail to sew last row to first row of cuff.
Size 8/10:
Row 1: Fhdc-57
Rows 2 – 33: Ch-1, turn, hdc in each st to end. (57)
Underarm/Armhole row:
Row 34: Ch-1, turn, hdc in 42 sts only, then ch-16. (58)
Front:
Row 35: Hdc in 2nd ch from hook and in each to end. (57)
Rows 36 – 41: Ch-1, turn, hdc in each st to end. (57)
Row 42: Ch-1, turn, hdc2tog, hdc2tog, hdc in each st to end. (55)
Row 43: Ch-1, turn, hdc in each st to end. (55)
Row 44: Ch-1, turn, hdc2tog, hdc2tog, hdc in each st to end. (53)
Row 45: Ch-1, turn, hdc in each st to end. (53)
Row 46: Ch-1, turn, hdc2tog, hdc2tog, hdc in each st to end. (51) Fasten off leaving a long tail for sewing shoulders. Do not weave in ends.
Other front:
Attach to bottom corner, with top of cardigan to your left as pictured…
Row 1: Ch-1, hdc in 42 sts only, then ch-16. (58)
Row 2: Hdc in 2nd ch from hook and in each to end. (57)
Rows 3 – 8: Ch-1, turn, hdc in each st to end. (57)
Row 9: Ch-1, turn, hdc2tog, hdc2tog, hdc in each st to end. (55)
Row 10: Ch-1, turn, hdc in each st to end. (55)
Row 11: Ch-1, turn, hdc2tog, hdc2tog, hdc in each st to end. (53)
Row 12: Ch-1, turn, hdc in each st to end. (53)
Row 13: Ch-1, turn, hdc2tog, hdc2tog, hdc in each st to end. (51) Fasten off leaving a long tail for sewing shoulders. Do not weave in ends.
Lay cardigan out flat and fold the two “fronts” in to form shoulders/armholes. Sew shoulders together end for end using the Mattress Stitch. Do not weave in all of these ends yet. (We’ll use them to cinch any holes after both the edging and sleeves have been added).
Sleeves Size 8/10:
Attach yarn in bottom center of armhole with slst…
Row 1: Ch-1, hdc evenly around opening. Join to first hdc with sl st. (32)
Rows 2 – 7: Ch-1, turn, hdc in each st around. Join to first hdc with sl st. (32)
Row 8: Ch-1, turn, hdc2tog, hdc in each st around. Join to top of first hdc with sl st. (31)
Row 9: Ch-1, turn, hdc in each st around. Join to first hdc with sl st. (31)
Row 10: Ch-1, turn, hdc in all but last two sts, hdc2tog. (30)
Row 11: Ch-1, turn, hdc in each st around. Join to first hdc with sl st. (30)
Rows 12 – 23: repeat rows 8 – 11 (ending with 24 sts)
Rows 24 – 30: Ch-1, turn, hdc in each st around. Join to first hdc with sl st. (24)
Cuff:
Row 1: Where still attached… Ch-7, sc in 2nd ch from hook and in each ch to end. Sl st to next open st on sleeve. (6)
Row 2: Sl st to next open st on sleeve, turn. Sc in blo of next 5 sts, sc in both loops of last st. (6)
Row 3: Ch-1, turn, sc in blo of each st to end. Sl st to next open st on sleeve. (6)
Repeat rows 2 & 3 all the way around the cuff. When you get back to the first row, and there are no more sts left on sleeve, fasten off leaving a long enough tail to sew last row to first row of cuff.
Size 10/12:
Row 1: Fhdc-60
Rows 2 – 34: Ch-1, turn, hdc in each st to end. (60)
Underarm/Armhole row:
Row 35: Ch-1, turn, hdc in 43 sts only, then ch-18. (61)
Front:
Row 36: Hdc in 2nd ch from hook and in each to end. (60)
Rows 37 – 42: Ch-1, turn, hdc in each st to end. (60)
Row 43: Ch-1, turn, hdc2tog, hdc2tog, hdc in each st to end. (58)
Row 44: Ch-1, turn, hdc in each st to end. (58)
Row 45: Ch-1, turn, hdc2tog, hdc2tog, hdc in each st to end. (56)
Row 46: Ch-1, turn, hdc in each st to end. (56)
Row 47: Ch-1, turn, hdc2tog, hdc2tog, hdc in each st to end. (54) Fasten off leaving a long tail for sewing shoulders. Do not weave in ends.
Other front:
Attach to bottom corner, with top of cardigan to your left as pictured…
Row 1: Ch-1, hdc in 43 sts only, then ch-18. (61)
Row 2: Hdc in 2nd ch from hook and in each to end. (60)
Rows 3 – 8: Ch-1, turn, hdc in each st to end. (60)
Row 9: Ch-1, turn, hdc2tog, hdc2tog, hdc in each st to end. (58)
Row 10: Ch-1, turn, hdc in each st to end. (58)
Row 11: Ch-1, turn, hdc2tog, hdc2tog, hdc in each st to end. (56)
Row 12: Ch-1, turn, hdc in each st to end. (56)
Row 13: Ch-1, turn, hdc2tog, hdc2tog, hdc in each st to end. (54) Fasten off leaving a long tail for sewing shoulders. Do not weave in ends.
Lay cardigan out flat and fold the two “fronts” in to form shoulders/armholes. Sew shoulders together end for end using the Mattress Stitch. Do not weave in all of these ends yet. (We’ll use them to cinch any holes after both the edging and sleeves have been added).
Sleeves Size 10/12:
Attach yarn in bottom center of armhole with slst…
Row 1: Ch-1, hdc evenly around opening. Join to first hdc with sl st. (36)
Rows 2 – 6: Ch-1, turn, hdc in each st around. Join to first hdc with sl st. (36)
Row 7: Ch-1, turn, hdc2tog, hdc in each st around. Join to top of first hdc with sl st. (35)
Row 8: Ch-1, turn, hdc in each st around. Join to first hdc with sl st. (35)
Row 9: Ch-1, turn, hdc in all but last two sts, hdc2tog. (34)
Row 10: Ch-1, turn, hdc in each st around. Join to first hdc with sl st. (34)
Rows 11 – 30: repeat last 4 rows in order (ending with 24 sts)
Rows 31 – 32: Ch-1, turn, hdc in each st around. Join to first hdc with sl st. (24)
Cuff:
Row 1: Where still attached… Ch-7, sc in 2nd ch from hook and in each ch to end. Sl st to next open st on sleeve. (6)
Row 2: Sl st to next open st on sleeve, turn. Sc in blo of next 5 sts, sc in both loops of last st. (6)
Row 3: Ch-1, turn, sc in blo of each st to end. Sl st to next open st on sleeve. (6)
Repeat rows 2 & 3 all the way around the cuff. When you get back to the first row, and there are no more sts left on sleeve, fasten off leaving a long enough tail to sew last row to first row of cuff.
Edging (all sizes):
Attach anywhere along bottom of cardigan with sl st (side seam looks nicest)…

Row 1: Ch-7, sc in 2nd ch from hook and in each ch to end. Sl st to top of corresponding open row/stitch on body. (6)


Row 2: Sl st to next open row/st on body, turn. Sc in blo of next 5 sts, sc in both loops of last st. (6)
Row 3: Ch-1, turn, sc in blo of each st to end. Sl st to corresponding open st on body. (6)
Alternate rows 2 & 3 all the way around the entire cardigan.

When working up the curved front edges, only slip stitch to body ONE time in between rows. This keeps the curved portion of the cardigan body from puckering while allowing the outsides of those edging rows to continue to grow.
If you need help with the edging, the video tutorial will help!

Complete neck section as bottom edge. When you get all the way back around to where you started, fasten off leaving a long enough tail to sew last row to first row.


Sew to ends together and you are done! I hope your child loves their new Velvet Cardi, and if you love the feel of yours, make your own with the adult pattern! 😀
More free patterns for kids:
Velvet Cardigan Free Crochet Pattern for Little Kids
Bomber Cardi for Kids (size 2/3T)
Chunky Ballet Slippers Crochet Pattern (Kids Size Included!)


34 Comments