How to Crochet a Rag Rug
This post may contain affiliate links, meaning that I may earn a small commission if you make a purchase. See our disclosure policy for more information.


There’s something about a rag rug that makes a space feel cozy and inviting, don’t you think? With a pop of color and a fun, vibrant vibe, I think every room could benefit from a good rag rug. Let’s crochet one up today with this free crochet pattern!

Rag Rug Crochet Pattern
This is the newest installment in my 2021 Household Crochet Series, and I am absolutely in love!
Rag rugs are not only stylish, but can be very economical as well. Sure, you could go to the craft store and hand-pick the fabrics to use for yours, but that can get pricey. Just think of all of the old sheets you have in the linen closet or, if you sew, the remnants of fabric in your stash. You could even go to the thrift store and pick up someone else’s old sheets to use.

Do you have a bunch of fat quarters in your craft room? Turn them into a gorgeous, squishy rug that will have everyone asking where you bought it. Then you get to say “I made it, of course!” 😉


There is a bit of prep work involved when making a rag rug. First let’s gather our supplies…

Materials:
1″ Continuous Bias Tape (or virtually any cotton fabric strips cut in 2″ strips diagonally/on the bias)
I followed this tutorial for making continuous bias tape from pieces of fabric. I used several one or two-yard pieces of fabric and multiple fat quarters and cut them into 2″ strips.
Full disclosure: I eyeballed all of it so some of my strips were a bit more wonky than others, but that’s the beauty of it, don’t you think? I did run the fabric strips through my bias tape maker, but that is 100% not necessary and feel free to skip this step if you are so inclined.
If you need help reading a crochet pattern, make sure you head over here and check out this detailed post.
Add this to your queue on Ravelry here.

A BIG thanks to Marilyn from the Heart Hook Home crochet community for all of her fabric advice and help! 🤩


When changing to a new strip or color of fabric, I found it easiest (and most visually appealing) to sew the two ends together to hide the seams as best as possible. Instead of simply tying a knot with the two ends, I lined up both edges and sewed just a few stitches using needle and thread. This kept the edges virtually seamless with no noticeable knots poking through, but it could also add character if you choose to do it that way.

The sewing here does NOT have to be pretty! Chances are you won’t be able to see it anyway once it is crocheted up. The point is only that it is secure.

Wanna save this for later?
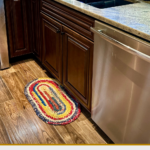
This rag rug pattern is made in an oval shape. The finished dimensions of this particular rug pictured is 16″ x 28″, so perfect to put in front of the kitchen sink or in the bathroom. You could easily make it larger by continuing to add rows, increasing every other row as outlined at the end of the pattern.
For this pattern we are using the Half Double Crochet stitch. I did try it with single crochet first but ended up ripping that version out and I am so glad I did because the half double stitch gives it a much more squishy and plush feel against your feet. I hope you love it as much as I do! Let’s get started, shall we?

Rag Rug Pattern:
Round 1: Ch-21, 3hdc in 2nd ch from hook. (mark first stitch with stitch marker) hdc in each to end, 6hdc in last ch. Working up the opposite side of the chain, hdc in each st to end, 3hdc in beg st. (48) Do not join throughout. Work in spiral, continue using stitch markers to mark first st of each row.
Round 2: 2hdc in next 3 sts, hdc in next 18 sts, 2hdc in next 6 sts, hdc in next 18 sts, 2hdc in each of last 3 sts. (60)
Round 3: Hdc in each st around. (60)
Round 4: * hdc in next, 2hdc in next * repeat between * * 2 more times, hdc in next 19 sts. Repeat between * * 6 more times, hdc in next 17 sts. Repeat between * * 3 more times. (72)
Round 5: Hdc in each st around. (72) Hdc in next st. (to push the seam over)
Round 6: * hdc in next 2 sts, 2hdc in next * repeat between * * 2 more times, hdc in next 19 sts. Repeat between * * 6 more times, hdc in next 17 sts. Repeat between * * 3 more times. (84)
Round 7: Hdc in each st around. (84) Hdc in next st. (to push the seam over)
Round 8: * hdc in next 3 sts, 2hdc in next * repeat between * * 2 more times, hdc in next 19 sts. Repeat between * * 6 more times, hdc in next 17 sts. Repeat between * * 3 more times. (96)
Round 9: Hdc in each st around. (96)
To finish off: Sc in next 3 sts, sl st in next 5 sts. Weave in ends using a smaller crochet hook through the back of the rug.
If you would like to continue adding rounds to increase the size of your rag rug, you would hdc one more time at the end of round 9 (again, to push the seam over).
Then for round 10 you would increase your stitches to * hdc in next 4 sts, 2hdc in next * followed by a regular hdc row for round 11 with an extra hdc at the end (again, to push the seam over).
Then for round 12 you would increase your stitches to * hdc in next 5 sts, 2hdc in next * followed by a regular hdc row for round 13 with an extra hdc at the end (again, to push the seam over).
Continue increasing every other row until the size is as big as you like!

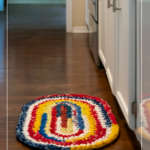
How awesome is this?! Will you use hand-picked fabric, old sheets, fat quarters, or fabric remnants to make yours? I think the more color the better! You can always go back and add more to your rug later if you decide you want it bigger. Isn’t that awesome? I hope you love your new rag rug, and that you’ll share a photo with me in the Heart Hook Home Crochet Community on Facebook or by tagging @HeartHookHome across all social media. 😁
More free patterns for the home:
Hanging Baskets: Free Crochet Pattern
Llama Dusting Mitt: Free Crochet Pattern
Crochet Pan Protectors Pattern (Small, Medium, Large, X-Large)
Trinity Cloth: Free Crochet Cloth Pattern in Three Sizes


18 Comments