How to Crochet the Thermal Stitch
This post may contain affiliate links, meaning that I may earn a small commission if you make a purchase. See our disclosure policy for more information.
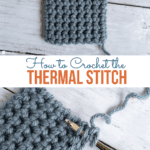
The Thermal Stitch is one of the thickest, sturdiest, and warmest crochet stitches we can make. This stitch is effectively the thickness of TWO pieces of crochet, and is great for making pot holders, warm mittens or beanies, and even casserole carriers! Learn how to crochet the thermal stitch using this written and video tutorial.

Thermal Stitch Crochet Tutorial
If you are looking for the thickest crochet stitch, this is it. If you are looking for the warmest crochet stitch, this is it. If you are looking for a heat resistant crochet stitch, this is a great one!

The thermal stitch is a simple variation of the single crochet. Instead of going through the two loops of the current row (the front loop and back loop), you’ll go through only the back loop of the current row and then the open loop from the row below it. Does that sound confusing? It’s really quite simple when you see it done. Let’s start!

To crochet the thermal stitch:
1. Chain any number of chains. There is no multiple required for this stitch.

2. Starting in the second chain from the hook, single crochet using the back loop only. Complete to the end of the row. Chain one and turn.


3. Going into the back loop only of this row and the second half of the beginning chain (the loop you did not use) single crochet to the end of the row. Chain one and turn.


4. Again using only the back loop of the current row and the unworked loop from the row below, single crochet across.

Continue in this manner until the piece is as tall as you’d like it to be. When you’re ready to finish your work, you’ll need to crochet the following:
5. Chain one and turn, going through BOTH loops of the current row AND the open loop from the previous row (for three loops total) single crochet across.

Wanna save this for later?
That’s it!
You can use the thermal stitch to make just about anything. The stitch creates a dense fabric that is not very forgiving, so I would stay away from wearable (like ponchos, etc) when using this stitch.
Because we are going into the current row AND the row below, this stitch takes a while to get height built up. Each row is very short so it does take a long time to work up. For this reason I do not recommend using the Thermal stitch in larger projects such as blankets etc.
Thermal Stitch VIDEO Tutorial:

Stick to smaller projects.
Use this stitch in projects that need to be either super sturdy or super warm.
This stitch is great for potholders because there are virtually no holes (or very very small holes). As always make sure to avoid acrylic yarn if a project needs to be heat resistant, 100% cotton is best. Be sure to test them out before using on a super hot dish if at all possible, and use at your own discretion and risk.
How to count rows in the Thermal Stitch:
Because of the way the thermal stitch is worked, it can be difficult to count your rows. I find it helpful to leave the beginning tail loose and use that as an aid. For example, if the tail is on your left, you’re currently working an ODD numbered row. If the tail is on your right, you know you are working an EVEN numbered row. That being said, and also because of the way this stitch is worked, you will also notice that it appears that you are always looking at the “back” of the stitch.

Orient the piece so that the beginning tail is on the left (or right if you’re left handed). The first row you see there is actually row two. Now, count each upside down “v” as two rows. Here I have 13 rows.
Isn’t that a great way to keep on track? You could, of course, also use a row counter app like one of these.
What project will you use the Thermal stitch for? If you’re looking to use it now, why not whip up a casserole carrier using my new, free pattern?! I love this so much and I hope you do, too!
More crochet tutorials:
Lucet Fork Tutorial: Make Cord, Drawstring, Garland and More!
Alpine Stitch Crochet Tutorial
How to Crochet the Granny Stitch in Flat Rows
Aligned Clusters Crochet Stitch Tutorial


4 Comments